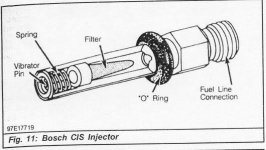
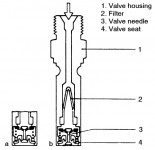
What do we know about the injectors, being buried deep in the inlet manifold, and no convenient way of inspecting them ? The answer is very little, unless they are removed and then tested on the bench, or by way of some other means. In this case, it was by other means as a previous testing facility was no longer available, so another method had to be devised.. I also rang around to see if there were alternative sources that could carry out the tests, but those efforts came to nought. So, the question was: How do you test them ?
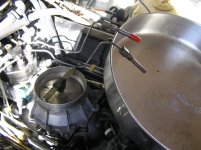
The initial advice was to remove an injector, presumably one at a time, start the engine and observe the spray pattern. I removed two and tried to start the engine, but really that was disastrous. The engine ran like a chuff cutter, noisily, and you just couldn't keep it running unless you had another person playing with the throttle. Highly unsatisfactory. At this stage, I should also point out that it helps to have spare fuel lines as illustrated.

Now, that is the only photo in this thread. Regarding spare fuel lines - yes, one can use the ones fitted to the car, but each line is a certain length with well defined bends and curves, in other words shapes, and fitment at each end into the injector and the fuel distributor is very precise - you just do not get those lines out of shape. Thus, the reason for the spares. In this instance, I also had some spare injectors, including new, so again it helps to have some of those on hand. Just in case, but also to enable a comparison to be made between "good", not so good or just plain unserviceable.
With those two spare lines hooked up, I fitted the first two injectors to them. You also have to disconnect the wiring loom from the switch on the inlet manifold so that one has a continuous supply of fuel when the ignition is turned on. So, having done that, in other words ignition on, wiring disconnected, injectors fitted to the lines, it is now simply a matter of pushing down the large metal "diaphragm", and the injectors will start spraying. There is obviously no need to run the engine. Just have the ignition turned on.
We now have to look at the spray pattern. It is to be strong with an even cone shaped fine "spray mist". It was quite clear that, in this initial test, there was a different spray pattern between the two injectors. One exhibited just three or four strong "squirts", with negligible mist. Clearly, faulty to some degree. The other one was fine, but I now proceeded to test all my other spare injectors, including four new ones. It did not take long to sort out the good from the bad, but I set them aside as I then proceeded to remove and test the other six injectors one at a time. Altogether, I finished up with three good original injectors which I refitted, with the rest either spraying to the side, rough "mist" and it is quite surprising that one can also test the spray pattern by the degree to which the diaphragm is pushed down. The further down, the stronger the squirting or spraying action.
The whole job, from go to whoa, took nine hours. Having done it once only, any subsequent effort can probably be reduced by, say, two hours. This is also one job where re-assembly can be achieved quicker than dismantling. Naturally, I should also point out that new rubber sealing pads were fitted. Regards Styria


