'Milky' anodized trim

More threads by Styria

OzBenzHead

Master
Messages
361
Points
151
Location
Byron Shire NSW Australia
I've been researching de-anodising processes (no fabulous revelations to share yet) and came across a video tutorial in which the following product was used:

Greased Lightning Commercial Strength Multipurpose Cleaner Degreaser. I have emailed the manufacturer asking if the product is available in Oz (lots of "nice-but-nasty" chemicals seem to be readily available in the US but not elsewhere).

The active ingredients are:
* sodium hydroxide
* 2-butoxyethanol
and a "proprietary surfactant".

The video can be found at http://www.youtube.com/watch?v=FLvxMJ5_WZE .

I don't endorse this process or product -- am merely sharing results of far-from-conclusive research.
 

450SE

New Member
Messages
187
Points
0
Location
Melbourne, Australia
I should have mentioned (although I'm not sure this is the right post to do it in) - Mercedes have offered to track down a copy of the original data card. Not 100% sure what it will show, but it could make for interesting reading & if nothing else... nice to keep with the books & service records.
 

450SE

New Member
Messages
187
Points
0
Location
Melbourne, Australia
I'd be interested in seeing those prices when you get them.

I have been told by numerous Oz-based suppliers that these parts are NLA.

All parts are available through the Mercedes Benz dealership network, but have to be brought in from overseas.
The figures listed are retail, excluding GST:

Moulding, Front door 546.53
Moulding, Rear door 208.77
Moulding, A-Pillar 446.50
Moulding, C-Pillar 616.65
Drip Moulding 219.27 (not exactly sure what this is - but I'm sure it's important!) :D
Drip Moulding 219.27

Grand Total 4075.44 (+GST)
4482.98 inclusive

...and that's just for the chrome around the doors... :eek:
 

abl567

Super Moderator
Moderator
Messages
2,186
Points
240
Location
Sydney
Did the dealer supply you part numbers for the trim pieces, if so please post them and I'll do some homework, my guess is I can halve those prices. No promises but I'll give it a go, and you will recieve them sooner:)
 
OP
Styria

Styria

The Godfather
Moderator
Messages
9,403
Points
622
Location
Sydney
Hi 450Se, at those prices, and irrespective of abl567's alternatives, I would need to subscribe to the theory of 'Patina' - you know the description so rationally used to describe old, cracked, and discoloured leather or worn out trim that saw better days probably at least thirty years ago.

As you know, I have experimented - did you ever get around to get yours professionally 'buffed' ? My process is working, shall we say, okay with some reservations, but certainly a hell of a lot better that what the stuff used to be like. Thus far, it's been a reasonable alternative. Regards Styria

N.B. Sorry about the Moderator bit - just had to do some 'deleting" but you know that I am Styria, one of three moderators.
 

bronzy935

New Member
Messages
16
Points
0
Location
Surrey, England
On a 79 model 6.9 are all the trim parts aluminium or are some stainless steel? Not counting bumpers of course?

Having seen the results in Godfathers pics I am definitely going to start this weeked.
 
OP
Styria

Styria

The Godfather
Moderator
Messages
9,403
Points
622
Location
Sydney
On a 79 model 6.9 are all the trim parts aluminium or are some stainless steel? Not counting bumpers of course?

Having seen the results in Godfathers pics I am definitely going to start this weeked.

Hi bronzy 935, lemme see if I can recount all the trim that is NOT alumunium of some sort - your front and rear bumpers, your grille surrounds, and the gutter trim - you know, it runs along the length of the roof line - the rest is your 'lovely aluminium - oh, don't worry about the wipers. If I can suggest this - I really do think that two pack clear is the way to go. If you haven't got the equipment or facilities to spray 2 pack, get someone to do it for you as you ought to get a better and longer lasting finish - but, remember, it may not be your perfect solution. Regards Styria
 

s class

New Member
Messages
788
Points
0
Location
South Africa
Moulding, Front door 546.53
Moulding, Rear door 208.77
Moulding, A-Pillar 446.50
Moulding, C-Pillar 616.65
Drip Moulding 219.27 (not exactly sure what this is - but I'm sure it's important!) :D
Drip Moulding 219.27

I will assume that is in AUS$, if so, those prices are around 4 to 5 times higher than what I've been quoted here in South Africa at the dealer.

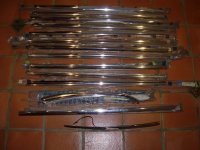
On the other hand, I recently scored this on ebay :

DSCN4054.jpg

All NOS, except the trunk handle, which the seller suggested might be 'low miles' item, however on inspection, to me it apears it could in fact be NOS.
 

OzBenzHead

Master
Messages
361
Points
151
Location
Byron Shire NSW Australia
I will assume that is in AUS$, if so, those prices are around 4 to 5 times higher than what I've been quoted here in South Africa at the dealer. [...]
Perhaps because there's an M-B plant in SA, and there is some NOS on hand?

Of course here in Oz, apart from a few Finnies, there has never been local build or assembly. Add to that the fact that Oz represents something like no more than 1% of the total M-B car market, and there is the "excuse" for ripping us off for spares.

OTOH the US, being M-B's largest export market, seems to get the best parts prices by far.

The only logic I can see there is that exporting just a few parts to Oz, compared with huge shipments to the US, calls in economies of scale (for shipping costs).

It still strikes me as disproportional, though.
 
OP
Styria

Styria

The Godfather
Moderator
Messages
9,403
Points
622
Location
Sydney
I can now bring you up to date a little bit on this experiment of mine. I used two types of materials, namely 2-pack clear and clear acrylic gloss just out of a spray can. I am just not quite sure which parts were done in what material, and I have no feed back to convey as far as the 2 - pack is concerned.

However, the acrylic sprayed items I fitted to my 450SE that I have been refurbishing, and this car is presently parked in the open. I had sprayed the rear window trim surrounds and all of the window moulds that hold the weather strips against the glass. It did not take long for the clear to change to a 'gold' colour, and it just got progressively worse. I thus decided that 2 - pack was the way to go, but I needed to remove the gold clear first. That was pretty stubborn, as Thinners, neither 2-pack nor Multi Purpose, would remove the clear.

I had to use an automotive paint stripper in the end. Somewhat messy, but it worked and I have since resprayed all items in 2-pack clear. The result is excellent, and I am quite confident that the 2-pack is a much more robust painting process. If I remember correctly, I have a 2 pack window mould on one or two of the doors of 'Gleaming Beauty'', and there is no discolouring in evidence. I also have a brochure from an American company that claims to be able to restore the anodized strips to the original finish and I will dig up the details of that Company and post them on topklasse in due course. Regards Styria
 
Last edited:

Michel

The Prince of Arabia
Moderator
Messages
10,079
Points
775
Location
Sydney, Australia
The acrylic sprayed items I fitted to my 450SE that I have been refurbishing, and this car is presently parked in the open. I had sprayed the rear window trim surrounds and all of the window moulds that hold the weather strips against the glass. It did not take long for the clear to change to a 'gold' colour, Regards Styria

That stuff simply matches the paint... (after spraying) :p
 

SEL_69L

Aristocrat
Messages
1,320
Points
95
Location
Sydney, NSW, Australia
It was a remark by John S about 4 years ago that motivated me to write an article in the Mercedes Benz Club NSW Club magazine.

He had noted that he was fooling around with some WD40, spraying it onto some milky anodised trim; it brought the shine up very nicely, but as the WD40 evaporated over a week or so, the dull finish returned.

This inspired me to wipe some clear coat laquer over the trim, and so doing, re-invented this method of treatment. The rest is recent history (repeated). I can't really take any credit for it.

Obviously, you are going to get a better job if you remove the trim from the car, as Styria has done.
 

Oversize

Grand Master
Messages
5,863
Points
596
Location
Melbourne
I wonder if bi-carb soda blasting would remove the milky finish, before re-coating in two pack? I've heard that soda blasting can remove paint, without damaging chrome trim pieces. In fact, it seems it'll improve the finish on many chrome plated items. I wonder if this process would do the trick on aluminimum?? If anything it might save a bit of elbow grease..... ;)

What about the aluminimum (die cast?) engine fan? I've noticed quite a few white spots on the surface, which seems to indicate corrosion coming from within.
 
Last edited:

Michel

The Prince of Arabia
Moderator
Messages
10,079
Points
775
Location
Sydney, Australia
Michel: I had the opportunity of treating the alloy trim on your car. It is a great inprovement.

Many thanks David,
I feel humbled by your gesture. :eek:

Would you care to advise other forum members about the method you used?
 

SEL_69L

Aristocrat
Messages
1,320
Points
95
Location
Sydney, NSW, Australia
OK. It's simple, really. Not quite as good as what Stryria has shown previously in this thead, but almost as good.

Buy yourself a spray can of acrylic laquer. Get a piece of lint free rag, about 3 inches square. Spray some of the laquer onto a ball of the rag, and CAREFULLY wipe the rag over the alloy trim, so that the rag does not come into contact with the adjoining paint. With care. the whole job takes about 1/4 of an hour to do. Michel, I did that to your car with two coats, about three days apart. The second coat does not make that much extra difference, it just makes sure that the job is done completely.

When you have finished the job, remember to turn the spray can upside down, and jet the nozzle clean, so that the rest of the contents are available at a later time. This should be normal procedure with all spray cans.

Mercedes ?used? to offer a product with a part number, for the refurbushment of alloy trim. It turns out that it just happens to be a spray can of acrylic laquer!
 

Michel

The Prince of Arabia
Moderator
Messages
10,079
Points
775
Location
Sydney, Australia
Michel, I did that to your car with two coats, about three days apart. The second coat does not make that much extra difference, it just makes sure that the job is done completely.

I can't wait to see the finished product. :p

Alas, it will have to wait till the week after next as I'm off to Shanghai... :eek:
 

mathew

New Member
Messages
122
Points
0
Location
Wagga Wagga
I like what I see here! I have a spare set of trim for my W126 so I can practice on that before doing the set on the car, this is a god send anyone ever rung MB and asked for the price of a new piece, I have and passed out!

Cheers Mat
 

Similar threads

Top