6.9 Water Pump replacement

More threads by Styria

Styria

The Godfather
Moderator
Messages
9,403
Points
622
Location
Sydney
PART1 -

Removing and replacing the water pump from a 6.9 engine is straight forward enough, but there are a number of tricks, or call them idiosyncracies, that need to be taken care of. Strictly speaking, it is not necessary to remove the radiator core, but it certainly helps in gaining access to various components in the chain of parts to be removed.

1. To remove the fan and viscous coupling, the radiator shroud needs to come out as one unit with those components. The four 10mm bolts that secure the coupling to the water pump boss and pulley need to obviously need to be removed, with the bottom one needing to be brought up to a more accessible position, achievable by turning the power steering pump pulley with a 22mm ring spanner. Of course, if the radiator was removed first, one could turn the engine by means of the 50mm crankshaft retaining pulley bolt and turning the engine.

2. Optional, but helpful - removal of radiator. One will obviously need to remove top and bottom radiator hoses, also the hose that runs to the water overflow reservoir, and the two Automatic transmission cooling lines that fit to the bottom tank of the radiator. As far as those two hoses are concerned, try and plug them to prevent undue loss of transmission fluid. The radiator itself is supported by full length rubber seals that run down at the sides of the radiator, and two spring loaded retaining brackets - the brackets are not always easy to remove, and even more cumbersome to replace. I also find that WD40 or Inox applied to the sides of the rubber, plus a hydraulic lifting jack that may need to be placed under the radiator (block of timber wedged between jack and radiator tank) in order to "break the seal" and move the radiator upwards for eventual removal help in getting the radiator to move upwards. I always have the radiator properly cleaned and serviced by specialists prior to re-installation.

3. The next task is to reomove the water pump from its housing that's bolted to the block. In days gone by, most times I have been able to free the water pump from that housing without having to remove the crankshaft pulley. As I said, at all times except once. I just could not get the pump housing to clear the pulley. The pump and impeller are almost an interference fit in that housing, and it can be almost impossible to free the pump from the housing on account of the gasket seal just simply refusing to let go. It is almost impossible to apply suitable levers to prise the pump clear of that housing, and you always run the risk of damaging the pump beyond repair.

To be honest, I am terrified to cause damage to a pump due to breakage, considering the cost, and availability of a replacement pump. Thus, the next step is to remove the water jacket itself with the pump still attached - the jacket is the item between pump and engine block.
 
Last edited:
OP
Styria

Styria

The Godfather
Moderator
Messages
9,403
Points
622
Location
Sydney
Part 2.
-------------------------------

Prior to removing the water jacket/pump assembly, I deemed it wise to remove the alternator for no reason other than being able to gain comfortable access to the two securing bolts holding the right side (driver's) of the jacket to the engine block. Invariably, the bottom bolt of the two is always exposed to coolant/water and can be very difficult to undo. I have had my fun with that bolt, and invariably I replace the Allen headed type with the hexagonal type when re-fitting. The bottom flange on the left side (passenger) does not present the same problem. However, in order to remove the most sideways (to the right seen from front of car) water jacket securing bolt (to the block), one needs to remove the ignition distributor, as well as the distributor housingitself as well. Care should be taken to mark the position of the distributor to facilitate correct re-assembly. Incidentally, two of the long bolts securing the jacket/water pump combined require that you move the crankshaft damper back and forth in order to line up the cut-outs (two of them) with the bolts to be removed.

Part 3
--------------------------------------------------------------------------------

Refitting is a little tricky for a couple of reasons. Firstly, there are four gaskets. Pump to water jacket - no problem. I did use some Silastic to provide a positive seal, and I secure the pump to the housing by means of the four (5 ?) 10mm bolts. Always use a flat thin washer - never a split one to stop washers from cutting into the alloy of the pump body. It is easy enough to offer up the complete assembly to the engine block, and then locate it with two or three Phillips headed screwdrivers, holding the assembly just proud of the engine block. Why ? You still have to fit the gaskets - the large one in the middle (fairly easily achieved), and the two gaskets for the flanges of the jacket located down low on each side of the block.

There are two items that can be considered as stubborn to fit - the gasket on the right (as viewed from the front on the right hand side) is almost impossible to slide in on account of two large nut fittings, preventing one from sliding the gasket in. On the left hand side (as viewed from the front), the Air Compressor bracket juts out and in front of the water jacket, and you need to insert or refit a very thick washer to prevent the bracket from being bent, and to stop the possibility of water leaking past the bottom bolt that secures the flange. Thinking about this frustrating positioning of the Air Comp. bracket makes you wonder which galut in the design team came up with such a fitting - not a lot of thought went into it.

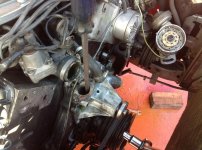
Picture hereunder illustrates the layout after removal of all components. Hopefully, more pics to follow. Regards Styria

MechanicalWork001_zps5303b102.jpg

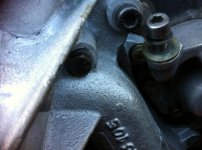
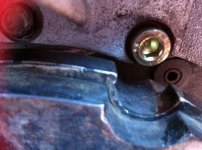
Taking you back to Part 2, I am referring to a bolt partially obstructed by the distributor housing - that shiny Allen headed bolt secures the water jacket - picture hereunder.

MechanicalWork026_zps3e24a0b2.jpg

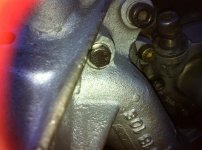
Another picture of the same bolt.

MechanicalWork027_zps25570805.jpg

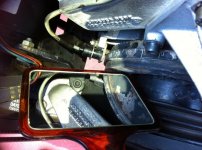
Referring back to Part 3, this picture shows the location of the bottom bolt that secures the housing flange on the DRIVER'S side of the car. Note that with the help of the mirror and the image thereon, you can see the exact location of that bolt.

MechanicalWork025_zps88a4612d.jpg

That's the area of some difficulty on account of a thick spacer that fits on the outside of the water jacket flange, with the space in between taken up by the spacer. If one didn't fit spacer, all you'd do would be to 'CRUSH' (or deform) the bracket, and you would not have a 'seal' to stop water from getting past the bolt that secures the jacket flange. Confusing, isn't it ? Sorry, I simply cannot explain or illustrate it any better than that. You'll understand it better once you get into the job.
 
Last edited:

Michel

The Prince of Arabia
Moderator
Messages
10,079
Points
775
Location
Sydney, Australia
Fascinating and very interesting post Godfather! Thank you.

Considering how expensive replacement water pumps are, have you found a 'more reasonable' option?
 

260ebenz

Master
Messages
6,668
Points
175
Location
NSW
Great stuff Styria - more technical and real car talk will see this forum back where it could be...:D
Regards,
Brian

Interesting what you say there Brian I never thought the Forum was ever lacking more technical and real car talk.

No disrespect directed towards you Brian by the way.

Anyhow Styria top post keep them coming.
:D
 
Last edited:
OP
Styria

Styria

The Godfather
Moderator
Messages
9,403
Points
622
Location
Sydney
Fascinating and very interesting post Godfather! Thank you.

Considering how expensive replacement water pumps are, have you found a 'more reasonable' option?

Michel,

Using a different source nowadays as the previous contact became no longer viable. The cost is almost the same as it was thirteen years ago. Regards Styria
 

SEL_69L

Aristocrat
Messages
1,320
Points
95
Location
Sydney, NSW, Australia
The car that Styria is working on is my car.
It is satisfying to know that the work that is being done is by good hands.

Interesting note about water pumps:
When I first had the water pump replaced about 10 years ago, I was told, after the work had been done, that it would have to pay $3,000. That pump wea rebuilt in Melbourne.

I told styria about the amount demanded.
He said:
"'Fella: they are being dishonest. You should pay $600 for a re built water pump"
I relayed that information to them, and said:
"I could have had that pump rebuilt for $600. I will pay you $600 , take it or leave it. If you don't accept, I will report you to Consumer Affairs"

They relented. I paid $600.

Styria has performed ALL of the work on my car since that time, for the last 10 years.
 

Michel

The Prince of Arabia
Moderator
Messages
10,079
Points
775
Location
Sydney, Australia
The car that Styria is working on is my car.
It is satisfying to know that the work that is being done is by good hands.

Interesting note about water pumps:
When I first had the water pump replaced about 10 years ago, I was told, after the work had been done, that it would have to pay $3,000. That pump wea rebuilt in Melbourne.

I told styria about the amount demanded.
He said:
"'Fella: they are being dishonest. You should pay $600 for a re built water pump"
I relayed that information to them, and said:
"I could have had that pump rebuilt for $600. I will pay you $600 , take it or leave it. If you don't accept, I will report you to Consumer Affairs"

They relented. I paid $600.

Styria has performed ALL of the work on my car since that time, for the last 10 years.

Shows you the power of the brand and the detriment it can cause sometimes.
If it were a Holden or a Ford pump, they would have marked it up 20% max.

But because It was a Benz, they thought they could slug you.
Great to have the Godfather around.

As a matter of fact, Michael also looks after my 6.9 too. ;)
 
OP
Styria

Styria

The Godfather
Moderator
Messages
9,403
Points
622
Location
Sydney
I do recall that episode with SEL69L, but if my memory is correct, they quoted him $1200.00. The price of $3K. may have related to a new pump at the time. That price seemed about right then. However, I stand to be corrected. Regards Styria
 
OP
Styria

Styria

The Godfather
Moderator
Messages
9,403
Points
622
Location
Sydney
Great stuff Styria - more technical and real car talk will see this forum back where it could be...:D
Regards,
Brian

I agree with you BenzBoy - I appreciate your words of encouragement. I know what is needed to lend more substance to the technical side of the forum. However, I can only do so much, and no more. Thus, I try and submit variations of other topics to lend some interest to the site, if nothing else. Regards Styria

N.B. In case you guys miss it, there is an update or edit of the original posts by way of further pictures.
 
OP
Styria

Styria

The Godfather
Moderator
Messages
9,403
Points
622
Location
Sydney
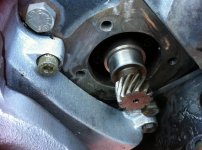
The picture hereunder illustrates the cut-out in the crankshaft pulley to gain access to the bolts securing the bottom of the water pump housing.

MechanicalWork022_zps83b03778.jpg

There are two of those cut-outs, and you will need to turn the engine (crankshaft pulley) in order to gain access to the second bolt. For that purpose, I use the 50mm socket with a long bar. You can also turn the engine by means of the 22mm nut securing the pulley of the power steering pump. However, more than likely, the spark plugs will have to be removed first to turn this lump of an engine - provided you have some compression left. :D Regards Styria

N.B. As a matter of interest, another picture of where the distributor housing is located.

MechanicalWork019_zps027c6bac.jpg
 
Last edited:

SEL_69L

Aristocrat
Messages
1,320
Points
95
Location
Sydney, NSW, Australia
The observant will notice a W126 an alloy W126 air cleaner cover in a 6.9 engine bay. I think the 6.9 engine bay is a dingy place. The use of an alloy air cleaner cover was a cheap way to brighten things up a little. I got it for free.
 
OP
Styria

Styria

The Godfather
Moderator
Messages
9,403
Points
622
Location
Sydney
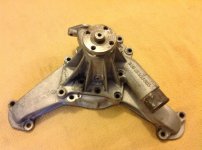
At long last (Photobucket), an overall picture of the water jacket (continually referred to), and the square bodied (late model) water pump attached to it. Please note that the the two outside bolts on the bottom of the pump can normally only be accessed by utilizing the cut outs on the crankshaft damper.

InterestingCars003_zps21e4263b.jpg

Apologies: It is the one on the left, next to the ignition timing pin - as seen from the front, and it is part of the water jacket.

Regards Styria
 

wbrian63

New Member
Messages
10
Points
0
Location
Houston, TX, USA
However, in order to remove the most sideways (to the right seen from front of car) water jacket securing bolt (to the block), one needs to remove the ignition distributor, as well as the distributor housingitself as well. Care should be taken to mark the position of the distributor to facilitate correct re-assembly. Incidentally, two of the long bolts securing the jacket/water pump combined require that you move the crankshaft damper back and forth in order to line up the cut-outs (two of them) with the bolts to be removed.

If you mark the position of the distributor prior to removal, then move the crankshaft back and forth (shouldn't you always turn it in the normal direction of rotation, never backwards?) how do you get the engine back in the same location as it was prior to removing the distributor?

Just curious...
 
OP
Styria

Styria

The Godfather
Moderator
Messages
9,403
Points
622
Location
Sydney
Hi Brian, you raise an interesting point or two. Regarding the removal of the Ignition Distributor, the two bolts that require for the damper cut-out to be moved are not all that far apart. I committed a couple of mistakes, even though I marked the position of the rotor button, but then promptly forgot at what point I had marked the rotor prior to moving the damper. It got to the stage where I suspected that the Distributor may have been 180 degrees out. Thus I started ll over again, turned the damper to TDC and inserted the Distributor. At first, I was one segment out, but that was easy to correct.

One of the features of the M100 6.9 engine is that the timing chain has the ratchet arrangement in both directions and the chain remains tight and under tension at all times - unlike the M116/117 engines that results in a loose chain if you turn the engine anti-clockwise. Regards. Styria
 

wbrian63

New Member
Messages
10
Points
0
Location
Houston, TX, USA
Thanks for the clarification Michael.

It is good to know that the M100 isn't so fussy about direction of rotation.

Maybe proper pre-positioning of the crank damper where one of the bolts is revealed - pull the dizzy, remove the bolt and move the crank to the 2nd bolt. Remove that bolt.

When reinstalling, reinstall the 2nd bolt, move the crank back to the first bolt position, reinstall that bolt and then the dizzy when the time comes...

As if I'd remember to do all that in the right order...

As if...

I'm pretty sure the water pump on #521 is got a weepy seal. We're "For Sure" moving it to the workshop this weekend, so we should be able to get the car running soon and find out for sure.

There's someone on eBay that occasionally offers reseal kits for the pumps. Maybe I can find the auction when the time comes.

My plan is to get the old girl to start and run reliably, then begin the restoration. Once the car runs well (as it did before I neglected it in the shed), I'll drain all the fuel down to a bare minimum, then dose what remains with fuel stabilizer and allow that to circulate up to the motor. That should give me no worries if it takes another year to get the car back on the road.

Regards
 
OP
Styria

Styria

The Godfather
Moderator
Messages
9,403
Points
622
Location
Sydney
Hi Brian, the procedure that you are recommending is exactly as I had intended to follow. All was well, of course, until I realized that I was no longer sure in which sequence the removal of the bolts had taken place. So naturally, once I started to crank the engine to start it, I lost all settings, and obviously she wouldn't start.

Regarding your own car, I note with interest that it is a fairly early model. That being the case, you may well find that the water jacket AND the pump may well differ from the photos I have posted. The jacket will closely resemble that of the 6.3 engine, but THE PHYSICAL size will be different. In addition, chances are that the water pump on your car will indeed be exactly the same as you'd find on a 6.3.

I am a little surprised that you still have so much work to do on your car. Maybe you have posted details on the 116.org site, but I only seldom look at that. Regards Styria
 
OP
Styria

Styria

The Godfather
Moderator
Messages
9,403
Points
622
Location
Sydney
I think I can take this thread a little further down the track. I have referred previously to the difficulty in fitting the gaskets, even though I indicated that the large one is a fairly easy fit. The following pictures illustrate some issues one can come across.

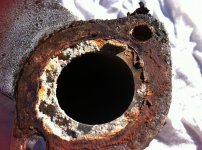
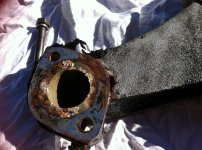
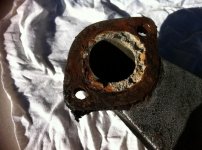
Firstly, corrosion of flanges - the picture hereunder quite clearly illustrates the sort of corrosion that can occur.

MechanicalWork041_zps8f0b13fe.jpg

All that pitting needs to be attended to before any attempt is made to refit the jacket.

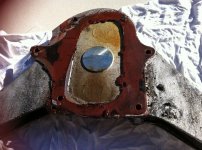
This is the less damaged side of the jacket - with the first picture, take note also of the black silastic. The mechanics that previously carried out replacement of the pump and refitting of the jacket did not fit the very thick spacer located between the front of the compressor bracket and the flange of the water jacket. That spacer is an absolute headache to fit - patience, patience, patience - but it can, and needs to be done. In their case, copious quantities of black Silastic sort of half did the trick, but it wasn't nice. I actually found the spacer nestled against the engine block. Incidentally, that side of the jacket - driver's side, is very much subject to rusting. I finished up breaking the head off the bolt.

MechanicalWork040_zps7ae45eee.jpg

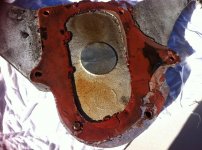
THe next picture shows the centre gasket - not very pretty, is it ? Obviously, the previous fitter experienced a certain degree of difficulty in fitting the gasket properly. What more can I say ? Just examing the photos carefully and you'll see that the gasket didn't cover the whole area.

MechanicalWork039_zpsc231bc7e.jpg

Another picture of the misplaced gasket.....

MechanicalWork036_zps44f099b9.jpg

Nasty - but it can be repaired.

MechanicalWork037_zps3288907e.jpg

Regards Styria
 

Oversize

Grand Master
Messages
5,863
Points
596
Location
Melbourne
Well I can now add to this thread since I’m 1/2 way thorough repairing the pump on Red Bull which is in the hands of the new owner. I also have a source for pump repairs for a reasonable cost in Melbourne thank to good mate Colin Mead. Pix n details to follow…
 

Oversize

Grand Master
Messages
5,863
Points
596
Location
Melbourne
Here’s some pix of the task undertaken so far. I can confirm the distributor needs to come off along with the air pump if fitted. Removal of the alternator might give more access & I removed the radiator which was leaking. I didn’t have the correct tools to remove the balancer which would include a 50mm socket, balancer puller & ring gear locking device. Care must be taken to make sure ALL bolts are removed before trying to remove the pump. Some of the lower bolts are VERY hard to see. Tap the pump gently from side to side & up/down on the fan flange with a hammer to loosen it from the distribution housing. In the end I removed the pump & secondary housing in one piece but had to loosen the AC compressor mounting bracket. Yes there’s a spacer bw the bracket & secondary housing which is easy to lose & MUST be reinstalled. Without it and the secondary housing will leak & you’ll have to do the lot twice! I also had to remove a power steering pump bracket bolt to remove the secondary housing since I broke one of the upper bolts on the drivers side. I got that out later by hammering on a double hex socket.
 
Similar threads
Thread starter Title Forum Replies Date
A water pump Mechanicals 7
L Water Pump Flow Rate Mechanicals 19
Styria 6.9 water pump housings Mechanicals 1
Styria 6.9 water pump removal Mechanicals 4
M The Chronicles Of Mercules - Water Pump Mechanicals 12
Styria 6.9 Water Pump Removal Mechanicals 4
S water circulating ? Articles 10
J Removing chrome grill from water box housing W116 Mercedes W116 5
S water on Brakes Mechanicals 3
S heater water temp. Mercedes R/C107 8
Oversize W116 Cabin water entry Mercedes W116 4
hoddo water/methanol injection Talking Torque 4
BenzBoy Water loss alarm. Mechanicals 4
Styria Removal of 6.9 Water Pumps Mechanicals 4
A Water Leaks Mercedes R/C107 7
B Water in boot and reconnecting drain pipe Mechanicals 8
B Water Leaking problem fixed Exteriors and Body Repairs 1
Oversize Fuel Pump Relay $$ Outrage Talking Torque 7
Styria Power Steering Pump Technical Information 1
Oversize Fuel pump safety cutout Mechanicals 5
Oversize 450 fuel pump relay Technical Information 11
Styria 6 cyl. (Pagoda) Injection Pump Articles 0
Oversize Petrol pump cutout Mercedes W116 1
MercedesMike 6.9 Transmission Pump Mechanicals 8
Styria Servicing 6.3 Injection Pump Mercedes W108 and W109 2
SELfor50 6.9 Suspension Pump - New (almost un-used) Gumtree/eBay/Facebook Listings 12
abl567 Injection pump replacement. Part 2 Talking Torque 3
abl567 Injection pump replacement. Mercedes W108 and W109 7
J Last rites for a fuel pump Mechanicals 0
B Which Bosch fuel pump do I need for my 450SE D-Jet 1975 Mechanicals 1
TJ 450 Washer pump removal on 6.9 Mechanicals 3
J Euro Headlamp Bushing DIY Replacement Technical Information 0
Oversize Replacement Wheels & Cleaning Exteriors and Body Repairs 3
Styria 6.9 Carpet Replacement Interiors 1
Oversize Suggestions for a daily replacement Talking Torque 20
c107 Monovalve replacement Mercedes W126 0
S Air Bag Replacement Mechanicals 9
4 450SEL Hood Pad replacement Exteriors and Body Repairs 23
L Clock Replacement Mechanicals 5
A Soft Top Replacement Mercedes R/C107 3
AM1961 Inertia Reel Seat Belt Replacement Interiors 18
WGB Rear 6.9 upper strut mount replacement Technical Information 0
WGB Rear sway bar chassis bush replacement Technical Information 0
WGB RH Sway bar chassis bush replacement in RHD 6.9 Technical Information 0
WGB Rear Screen removal and replacement Interiors 2
WGB M117 Timing Chain Replacement - Pictorial Technical Information 11
abl567 6.3 Camshaft replacement Mercedes W108 and W109 0
WGB Pictorial - Rear End Rebuild Part 7 - Diagonal arm bush replacement Technical Information 1
WGB Pictorial - Rear end rebuild Part 3 - Pinion seal replacement. Technical Information 0
Styria Replacement of four doors - 6.9 Technical Information 25

Similar threads

Top