'Milky' anodized trim

More threads by Styria

Styria

The Godfather
Moderator
Messages
9,403
Points
622
Location
Sydney
Pretty old, and frustrating subject, isn't it ? Well no, the subject is boring, the frustration comes with innumerable unsuccessful attempts to polish, cajole, do whatever, in an effort to bring back that shine, that lustre the stuff has been blessed with when new.

I have gone through my share of headscratching etc., and the last method I tried was to use the 3M stainless steel polish as advocated by BAR. Alas, again no real solution, nor satisfactory result. I had also not forgotten SEL69L's solution to wipe clear lacquer on the trim pieces and he felt that there was a definite improvement.

So, what have I done ? Well, I have just experimented with my secret formula. What do you think ?
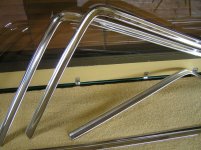
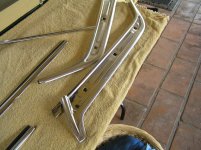
Anodizedtrim001.jpg

Anodizedtrim002.jpg

Anodizedtrim003.jpg

Anodizedtrim004.jpg

Anodizedtrim005.jpg

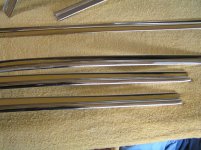
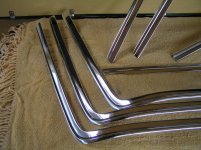
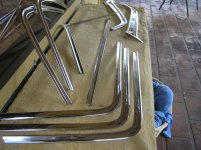
What I had noticed many times that if one would wet the 'milky' trim pieces, they'd be all shiny whilst wet. Once dry, however, it would be back to the somewhat shabby appearance. Anyway, I decided to expand on SEL69L's idea and actually two pack clear the trim pieces after having cleaned them as best as possible with detergent, fine steel wool and prepsol. The result is there to see - I think the improvement is remarkable. It's impossible to remove scratch marks etc., but I would rater have 'shiny scratch marks" instead of milky ones.

Now, I take no responsibility for what may happen down the track. The clear may peel off, it may get dull, but I have generally found that 2 pack products last and stick well.

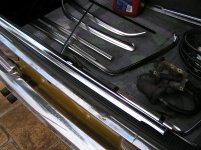
The next lot of photos of trim items in the boot of my gold 450 were sprayed in pressure pack clear gloss. Again, the shine is quite remarkable, but I suspect that it will not last as well. I used the same cleaning process, but heated the trim pieces prior to spraying.
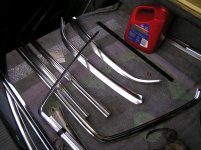
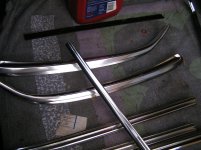
Anodizedtrim006.jpg

Anodizedtrim007.jpg

Anodizedtrim008.jpg

So far, I have every reason to be extremely pleased with my effort. Remember, of course, that photos can lie to some extent, but it was worth a try. Regards Styria
 
OP
Styria

Styria

The Godfather
Moderator
Messages
9,403
Points
622
Location
Sydney
Hi BenzBoy, you've seen the ones that I am keeping in the boot of the 450 - you haven't seen the others that were 2 pack clear coated as shown on top of the yellow bedspread. Thanks for your expression of judgement - it will now be interesting to see how long the clear finish will last. Regards Styria
 

s class

New Member
Messages
788
Points
0
Location
South Africa
Styria, thanks for sharing. The 'cleared' pieces may not be original, but it seems it may be the best solution that can be had for sensible money.


The fact the the items need to be polished prior to painting will tend to mitigate against the chances of the clear adhering as well as it might. I wonder if the pieces could be sanded with like a P1500 - ie a scratch fine enough that the clear would 'fill' the scratches making them invisible in the finished article.

I may just try this on a sample next time I have 2k clear in my paint gun.
 

s class

New Member
Messages
788
Points
0
Location
South Africa
I hope that post didn't come across as critical - it wasn't meant to be - I was just thinking out loud. I've heard several people talk of clearing over the aluminium as a solution, but you're the first that I'm aware of that's actually tried it. Well done.
 
OP
Styria

Styria

The Godfather
Moderator
Messages
9,403
Points
622
Location
Sydney
Hi S-Class, not at all. The way I see it, I welcome constructive criticism or someone else's opinion, again constructive, as par for the course. When some idiots feel the need to cross the line, even just for the sake of it, I then start to feel annoyed and have nothing but condemnation for them as individuals.

This job, S - Class, has at least on a temporary basis, removed a constant source of annoyance ever since I have owned Gleaming Beauty. You know, every time you wash and polish her, you think 'what about those trim strips' and I have never had a solution. Believe me, I have tried all kinds of polishes and solutions, and they've all been failures. One side effect is that you think 'why did they use such a crummy material' but one forgets the age of the car - nor does it help when you compare it with chrome or stainless trim on other cars and those materials do in fact respond to fettling and polishing.

I am taking in your thought on creating a 'more grippy surface' in the hope that the clear will 'stick' better, and more than likely it will. Mind you, I did use the finest of steel wool and polishing agent to obtain as much shine as possible prior to applying the clear gloss on a couple of pieces, but did not perservere for too long. Don't worry, I also used 1200, 800 and 2000 grade wet and dry, but none of those will remove scratches or marks. Perhaps once one gets into the real 'nitty gritty you may create a better surface, but you are more than likely to remove the shine, and the clear will not bring it back again. Thus, stay with 'gloss' as best as possible, and let the clear do the work.

One could lightly rub back the fresh clear coat (mainly to eliminate dust), and you may perhaps get an even better shine from an additional application.

I know what you are capable of, and I am looking forward to your assessment of the process once you have tried a couple of items. Regards Styria
 
Last edited:

SEL_69L

Aristocrat
Messages
1,320
Points
95
Location
Sydney, NSW, Australia
Although I have suggested applying clear coat laquer to a rag then carefully wiping that dierctly onto the alloy trim in situ, it would obviously be better to remove the trim from the car in a restoration job, and to approach the refurbisment of the trim in a more comprehensive manner. This will produce a better job, in which Styria is justifiably satisfied. I was looking in a 116 owner's handbook and found that Mercedes-Benz offers a product for the re-conditioning of the alloy trim, and it seems that the product offered happens to be clear coat laquer. So far as cleaning stainless steel trim is concerned, as on the eyebrow protective trim over the wheel arches is concerned, I have used 30,000 (!) grade cerium oxide polish that I have also used for removing shallow scratches and arc shaped hazing from my windsceen. You need an awful lot of patience with this one, because of the fineness of the abrasive. It took me five hours of hand rubbing to remove them. For this process I folded some corrugated cardboard around some hard rubber backing and applied the cerium oxide in a watery cream paste to the cardboard, and with hand rubbing, removed the scratches. The cerium oxide which is used for polishing telescope mirrors and lenses, was obtained From Naxos Chemicals. You can get a little messy, but is all removed with a simple hosing.
 

CraigS

New Member
Messages
713
Points
0
Location
Sydney
I know RonB is playing around with this and trying to remove the original anodising and to then polish and re-anodise so if he makes any progress, I will let you know.
 

WGB

New Member
Messages
1,289
Points
0
Location
Perth Western Australia
Great to see the result.

I find scratches in the surface the hardest to deal with.

The quality of new factory chrome trim for the cost is a little underwhelming so any other methods including re-plating need to be looked at.

Bill
 

450SE

New Member
Messages
187
Points
0
Location
Melbourne, Australia
Funnily enough, I attempted to restore the same trim sections over the long weekend, as I felt that I wasn't doing enough personally to lift the bar of my 450. :eek:
The way I attacked it was with ordinary household Silvo. It took a hell of a lot of elbow grease (so I kept to the passenger side window surrounds only) for the first attempt & it did lift the apearance - although milkiness persisted.
Assuming it isn't written off in 20 days time (yes, I am on countdown until D-Day), I will have the car professionally detailed. I'll be keen to see how the trimmings comes up after an electric buff has had a go... :D
 
OP
Styria

Styria

The Godfather
Moderator
Messages
9,403
Points
622
Location
Sydney
Hi 450SE, for all I know, you may well be on a winner when you talk about 'buffing'. I must admit that I have never tried to buff by machine - if we are talking about the trim pieces - so I am looking forward to the resultsa you may achieve. Mind you, do leave it for a little while before you come up with your verdict. Regards Styria
 

CraigS

New Member
Messages
713
Points
0
Location
Sydney
I don't think you will have any success with polishing it. The anodising is a chemical process/reaction and needs to be reversed before it can be polished. The removal process I believe involves caustic soda, and is one of the reasons why the trim turns milky in the first place, as this is what is used in commercial car wash outlets. If you find a W116 that has never been through a commercial car wash, you will also find almost perfect "chrome".
 
OP
Styria

Styria

The Godfather
Moderator
Messages
9,403
Points
622
Location
Sydney
I don't think you will have any success with polishing it. The anodising is a chemical process/reaction and needs to be reversed before it can be polished. The removal process I believe involves caustic soda, and is one of the reasons why the trim turns milky in the first place, as this is what is used in commercial car wash outlets. If you find a W116 that has never been through a commercial car wash, you will also find almost perfect "chrome".

Hi CraigS, that's possibly the best explanation I have yet read regarding the deterioration of these trim pieces. Just another word of caution to everyone that;s been reading the posts and procedures I have submitted - nothing can be, nor is guaranteed. Still tryng to evaluate the results of my efforts. Regards Styria
 
OP
Styria

Styria

The Godfather
Moderator
Messages
9,403
Points
622
Location
Sydney
Hi BenzBoy, the way I see it, the Glisten product or CLEAR, may adhere better than 2-pack clear. Who knows. However, so far, even the pressure pack clear is sticking reasonably well. It's too early to form a proper opinion. However, I still say (maybe with SOME doubt) that my experiment is stacking up "okay".

If the 'Glisten' product was available locally, I would certainly try it. BenzBoy, do you know if it can be bought locally. BTW, your ML at the topklasse concours - more than welcome. Just digressing. Regards Styria
 

BenzBoy

Grand Master
Messages
7,591
Points
705
Location
Sydney - Centre of Civilisation
Hi BenzBoy, the way I see it, the Glisten product or CLEAR, may adhere better than 2-pack clear. Who knows. However, so far, even the pressure pack clear is sticking reasonably well. It's too early to form a proper opinion. However, I still say (maybe with SOME doubt) that my experiment is stacking up "okay".

If the 'Glisten' product was available locally, I would certainly try it. BenzBoy, do you know if it can be bought locally. BTW, your ML at the topklasse concours - more than welcome. Just digressing. Regards Styria
The Glisten is available from the importers of POR - on the web address I gave you. It lists their phone number. That is also the place I buy my Leatherique.
Regards,
Benz-Boy
 

450SE

New Member
Messages
187
Points
0
Location
Melbourne, Australia
I've just contacted my friendly Mercedes Benz 'Parts Interpreter' to email me a quote on all new chrome trimmings for the window surrounds...
Perhaps I should raid the heart medication cabinet before reading though! :eek:
 
B

BAR

Guest
The distributor of paints and Leatherique is:

Permanent Painted Coatings Pty Ltd
1/4 Prosperity Parade
Warriewood Sydney NSW 2102
Phone: 1 800 643 229
Fax: (02) 9999-0394
http://www.ppc.au.com

They also have in their catalogue clay bars and all other lovely things to preserve and maintain our ageing W116s.
 

OzBenzHead

Master
Messages
361
Points
151
Location
Byron Shire NSW Australia
I've just contacted my friendly Mercedes Benz 'Parts Interpreter' to email me a quote on all new chrome trimmings for the window surrounds...
Perhaps I should raid the heart medication cabinet before reading though! :eek:
I'd be interested in seeing those prices when you get them.

I have been told by numerous Oz-based suppliers that these parts are NLA.
 

Similar threads

Top