Heater slides inoperative

More threads by Styria

Styria

The Godfather
Moderator
Messages
9,403
Points
622
Location
Sydney
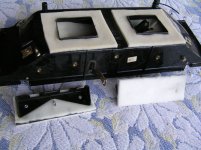
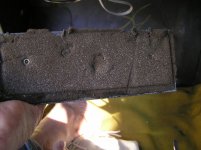
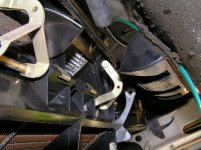
This is a common problem on 116 models - when the sliders become inoperative, it means that either of the two flaps has gone into the 'overcentre' position and become stuck. This invariably means that the foam that's glued to the flaps has disintegrated. It is in fact the foam that prevents the flaps from going overcentre. The first picture illustrates the flap and the poor state of the foam,
TechnicalPictures023.jpg

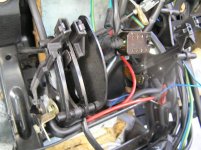
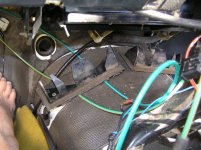
The two flaps are located within the bottom of the main heater box as shown.
TechnicalPictures021.jpg

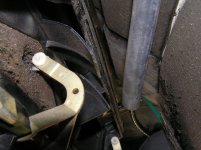
The next two photos should show the position of the two flaps being attached to the appropriate levers operated by the slider controls - from the outside.
TechnicalPictures020.jpg

TechnicalPictures019.jpg

I need to apologize for the way I took the two previous pictures - whilst clear and all that, they don't quite illustrate the position of the flaps inside the bottom of the heater box. Try your best - in any case, if one ever gets down that far, they'll be able to visualize the flap arrangement quite easily.

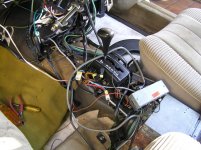
If you haven't done this job previously, I would advise that you take photos to assist in the re-assembly of all components. I've done it previously, and I still take photos - it's too difficult otherwise as there are a lot of components that require removal before you can actually remove the separate bottom section that is attached to the main heater box. The first picture is an 'overall' view of dismantling procedures involved.

TechnicalPictures026.png

TechnicalPictures024.jpg

TechnicalPictures017.jpg

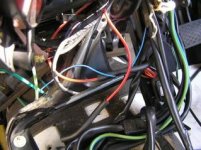
If you have a careful look at this second photograph, you will spot that particular lever just about in the very centre of the photograph. It portrudes through an opening in the main frame. That's a major cause of making this job so difficult and time consuming.
TechnicalPictures022.jpg

The next picture illustrates the very bottom section that is attached to the main unit, but needs to be removed before access gain be gained to the flaps.
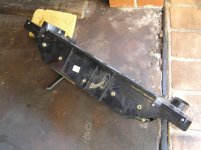
TechnicalPictures025.jpg

Please take note of the lever located in the centre of this bottom box section - now, that lever will cause you all manner of grief because of its location in relation to the main frame that secures all your sliding controls and various other components. That lever sticks out far enough to prevent you from sliding this box sideways and out of the way so that you can remove the flaps. Why MB did not come up with a lever arrangement in "two" parts, I will never know. Furthermore, that main frame - it's in the way of everything and you've just got to keep dismantling until it can be pulled towards the back of the car to enable that lever to clear it when moving the box sideways. I don't mean to be negative, but honestly, this job will drive you to distraction. If it wasn't for that lever.........apart from a few other items, but one can cope with those with patience and perserverance. Regards Styria

N.B. There is more reading material in this old thread.

http://www.topklasse.org/forums/showthread.php?t=904
 
Last edited:
OP
Styria

Styria

The Godfather
Moderator
Messages
9,403
Points
622
Location
Sydney
The next step is to re-foam the flaps and, wherever possible, the distribution flaps in the removable bottom section.

TechnicalPictures.jpg

I am not sure if the last named procedure is necessary, but I trey and do it anyway. Consideration also needs to be given to thickness of foam. Too thick, and maybe it won't work properly, too thin and one may finish up with stuck flaps somewhere down the road - it's obviously a situation that one would want to avoid at all costs. Regards, Styria
 

Oversize

Grand Master
Messages
5,852
Points
596
Location
Melbourne
I've only done this job once (at a dealer) and I can confirm it's a nightmare, even with factory support! It takes ages, looks like a dogs breakfast & if you don't get it right; out it comes again! There's various nuts n bolts of different sizes, which often only suit one application. It'd definitely be easier with a digital camera, but we never had them back then. I also concur with Styria that the thickness of the foam is vital and make doubly sure that it's trimmed correctly; otherwise the flaps will jam, or leak air. Mongrel!!!

Oh, I try to wash all components thoroughly before replacing the foam to eliminate any odours that may be present after years of use. It might be worth considering retrofitting a cabin filter, but I'd suggest that'd be even more of a nightmare... I saw a new product recently that used a mist to carry de-odourizer through the vents and kill any nasty smells. For $300 it'd wanna be good.....
 
Last edited:

BenzBoy

Grand Master
Messages
7,590
Points
705
Location
Sydney - Centre of Civilisation
Is that the Bacti-Gas device that kills all the mould spores and bacteria colonies that might lurk in the ducting? I use Glen 20 as an alternative and it seems to work.
Regards,
Brian
 
OP
Styria

Styria

The Godfather
Moderator
Messages
9,403
Points
622
Location
Sydney
Hi all, I have just gone through this thread again, and for some unfathomable reason one picture has disappeared, and another is now only about one third of the size it is supposed to be. My apologies, and I will endeavour to correct these anomalies as soon as possible.

To respond to your post, Mark - I don't know if you would recall, but it's that damned lever portruding from the middle of the bottom box that's causing most of these problems as far as dismantling, and obviously re-assembly, is concerned. Another area of annoyance, and creating awkwardness, is the quite crude heat shield/sound deadening (?) pad that the Company fitted to, wait for it, 6.9s only. Again I shake my head in wonderment - really, there is not a lot of additional heat, if any, that would be evident when compared with a 450 or 280 for that matter.

Contamination wise, I have never come across any bad odours or smells. It's just a simple heater arrangement. Naturally, everything that's re-fitted is nice and clean as a rule. I usually air blow that area and get the vacuum cleaner into action. Another area that I will be having a close look at will be the vacuum arrangement and the relation between the up and down levers, the micro switches and the hot water cut-off on the firewall under the bonnet. Regards Styria
 

WGB

New Member
Messages
1,289
Points
0
Location
Perth Western Australia
I had forgotton that it was possible to do this job without removing all the dash and the heater unit.

Looks like something I should be turning my mind and camera to some time in the not too distant future.

Bill
 
OP
Styria

Styria

The Godfather
Moderator
Messages
9,403
Points
622
Location
Sydney
Now that I have established that both the cooling and heating system are working properly, I would like to convey my final thoughts on this work. On reflection, there is one procedure that should be dealt with first, and that is the steel cradle that is located in front of the bottom part of the heater box. It would be best to remove the five bolts that secure it to the gearbox floor (2) and part of the main dashboard frame which also locates an additional stiffening brace. Once those bolts are removed, pull the bottom of the cradle towards the rear to gain easier access to the bolts (4) that secure the sliding lever brackets (2 - one on each side) and to enable the lever portruding from the box to clear the cradle when the box is moved sideways . It is hoped that the information in this thread will assist anyone in carrying out this work. Regards Styria
 

Helmet

Connoisseur
Messages
1,214
Points
59
Location
Sydney
I found replacing the foam hinges with leather would make them last forever (hopefully) :rolleyes:
 
OP
Styria

Styria

The Godfather
Moderator
Messages
9,403
Points
622
Location
Sydney
Hi Helmet, it's one material I had not even thought of, let alone considered. Hey, who cares - as long as it works or last (which it should) and as long as you can get a good seal. Regards Styria
 

Oversize

Grand Master
Messages
5,852
Points
596
Location
Melbourne
I'd certainly be keen on an option that means you NEVER HAVE TO DO THAT AGAIN!!! :D
 

WGB

New Member
Messages
1,289
Points
0
Location
Perth Western Australia
I have two cars that need this done so after my present summer of improvements it will be one of my next projects.

Do we have a measurement for the foam/leather (oh such a Germanic answer).

Bill
 
OP
Styria

Styria

The Godfather
Moderator
Messages
9,403
Points
622
Location
Sydney
No Bill, no measurement. I drill the rivets that hold together the plastic and metal parts of the flap, thouroughly clean the metal surfaces (rotary wire brush), glue the foam to both sides and trim to size after pop rivetting the two components. Regards Styria
 

Oversize

Grand Master
Messages
5,852
Points
596
Location
Melbourne
I think the reference to the measurement could've been related to the thickness of the foam. I'd imagine leather would be much thinner and might result in the flaps not sealing correctly. Perhaps thinner foam with leather over the top?? I agree with Tony that foam is not the ideal solution and it tends to trap things you wouldn't want in there... I'll be definitely looking at a cabin filter in more depth when I get to that area....
 

WGB

New Member
Messages
1,289
Points
0
Location
Perth Western Australia
The request was definitely for the foam thickness.

I have seen two cars re-foamed in WA and there was an issue with the foam being too thick.

Both these cars had the entire HVAC systems removed from the car which is a gargantuan avhievement and hearing it can be done with the dash in-situ is a great relief.

There is also "The Bentley Publications spring addition " which is another method of keeping the flaps on track and leaving the levers free to move.

Bill
 

Helmet

Connoisseur
Messages
1,214
Points
59
Location
Sydney
Best of both worlds if you use leather for the hinges and foam for the seal around the edges:)
 

Oversize

Grand Master
Messages
5,852
Points
596
Location
Melbourne
Foam density is also a problem, as it can effect the thickness of the foam that can be used. High density foam will not deform enough to seal and may prevent the flap from completing it's full range of movement. Low density foam may not seal completely, can deteriorate quicker and may even cause annoying noises. Then there's open and closed cell foams along with stuff that's semi-waterproof. So there's a lot to it and you'd wanna get it right before refitting it all back into the car. I'm certainly no expert, so any help would be appreciated....
 

Similar threads

Top