I must have liked carrying out this work previously on Gleaming Beauty, because I am knee deep into exactly the same thing as previously with my Astral Silver 6.9. Whereas this work on GB was one of absolute necessity on account of a very badly blown head gasket, the work on the Astral Silver car was more or less dictated by slight valve seating problems, and not water/oil issues.
As is my wont, I have some pics to show various facets of the work, but more importantly it is my intention to point out some of the pitfalls one may encounter and some aspects of the job that can lead to considerable frustration.
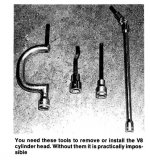
Initially, it is fair to state that this task is NOT for the handyman that can wield a spanner, nor is it possible to do in your home garage unless you have a compressor, and a varied selection of quite special assemblies of tools. Disassembly initially is quite straight forward - just a matter of removing some wiring, fuel lines etc. The fun, and skill factor, begins with the removal of the inlet manifold. Some of the bolts are in contact with water, and they can be a 'sod' to remove. You don't get many opportunities to 'crack' them, and it is easy to round out the Allen headed bolts. Good tools are needed here, and count on at least one or two broken bolts that will have to be removed from the head(s) when the Engineering Shop services them.
This next item refers to right hand drive cars only. On Gleaming Beauty, we left the Master Cylinder and power brake unit in place, rendering removal of the head bolts at the back very, very awkward. Also, exhaust manifold nuts/studs are quite awkward to get to. I was going to remove the booster unit by undoing the securing nuts BEHIND the dash, and had in fact removed them. The unit, however, did not budge so I left it in place and just removed the master cylinder. That helped considerably with access to nuts and bolts. Just an observation - the fact is that studs and nuts secure the exhaust manifolds to the heads. It really makes for an awkward removal as you have to pull the manifold away from the head(s) and you do not have a lot of space.
Next in line, of course, are the timing chain and chain wheels and tensioner. I decided to 'plastic tie' the chain to the wheels initially, but knocked the wheels off the camshaft(s). I also took photographs of the positioning of the camshaft lobes, with the engine at TDC. Once it is on that setting, I do not turn the engine again. Also, you need to ensure that the chain does not fall into the engine - secure it any way you like - just don't let it disappear down the 'gurgler'. You are now ready to remove the camshaft(s). Mind you, we're still on the driver's side. Here the point to pay attention to is the fact that, with the brake booster in place, you will NOT be able to remove one of the bolts securing the rear camshaft bearing. The bolt and bearing need to be removed together with the head as one unit. Also, forget any notion that the exhaust manifold and head can be removed/replaced as one unit. It just doesn't happen unless, perhaps, the steering box is removed. Not sure, but not otherwise.
So, let's go to the passenger side. Again, same problems with exhaust manifold studs/nuts. This time, however, you also have to battle with the EGR (?) valve that's fitted to the manifold. That's a real sod of an item. You can remove it all right, but the long studs are still sticking out and it's touch and go on account of space to remove the manifold. On Gleaming Beauty, you don't have that valve fitted to the manifold. There is also another issue one has to contend with on both sides - removal of the head bolts close to the exhaust manifolds - about four of them, on both sides, you just cannot remove unless the manifolds are out of the way. Hmm....There are some real skill factors that need to come into play - both now, and later when re-assembly commences. Anything else to report - no, not really, except for cleaning etc. and I'll cover that later. Could I put an estimate on the time required for removal - yep, I'd think you'd need at least twelve hours and a few choice swear words. Regards Styria


